
Desktop & Browser Automation
Flow-Like can automate browser pages and visible desktop applications from a Flow. The current Automation catalog includes direct browser and computer control, accessibility-based element lookup, template matching, reusable selectors, checkpoints, recovery helpers, and optional AI-assisted observation.
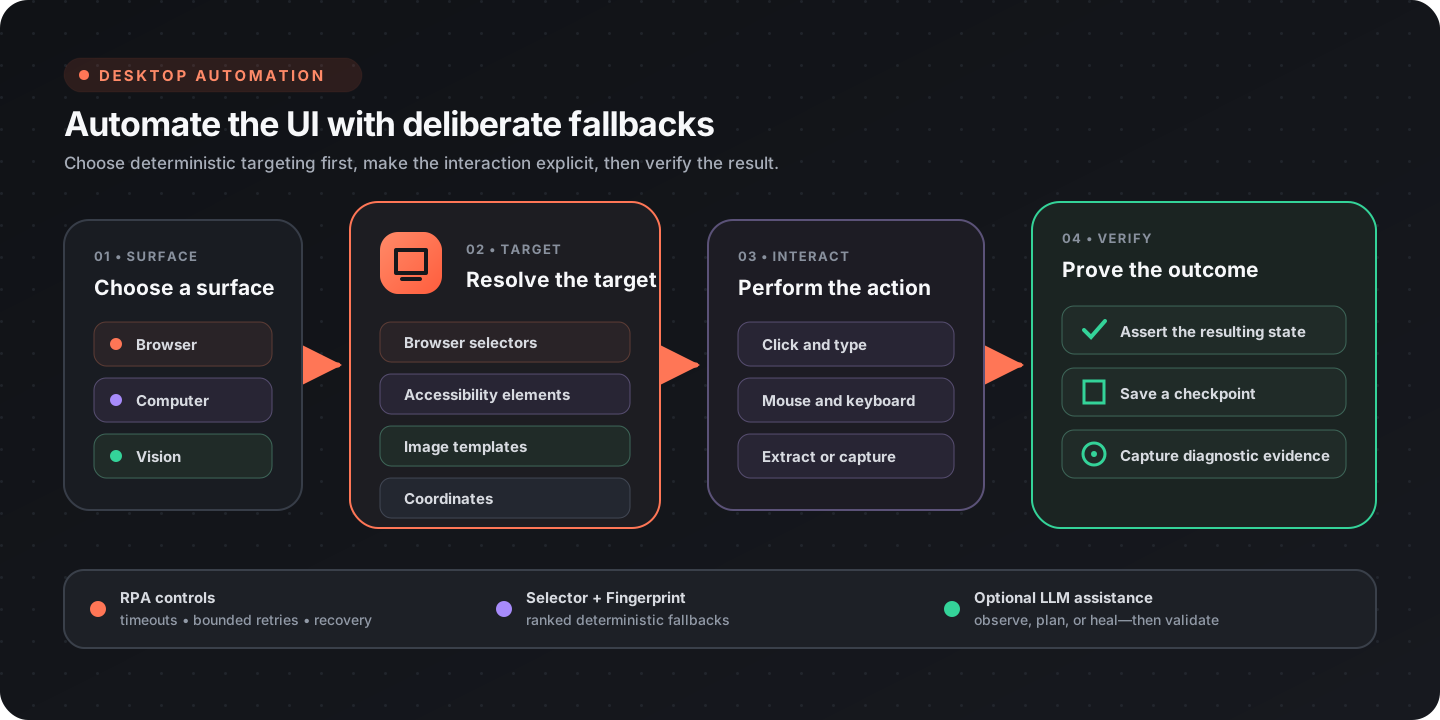
Choose the right automation surface
Section titled “Choose the right automation surface”| Surface | Best for | How it targets elements |
|---|---|---|
| Browser | Web applications, forms, downloads, and page extraction | Browser selectors and page state |
| Computer | Native desktop applications and system UI | Accessibility elements, windows, coordinates, and direct input |
| Vision | Interfaces without stable selectors or accessibility metadata | Image templates, regions, and pixel colors |
| RPA | Reliable orchestration around UI interactions | Retries, timeouts, checkpoints, assertions, and recovery |
| Selector | Reusable target definitions with multiple fallback strategies | Ranked selector sets |
| Fingerprint | Matching a target across UI changes | Stored and compared element fingerprints |
| LLM | Observation, planning, and recovery when deterministic targeting is insufficient | Configured vision-capable models |
Prefer the most deterministic surface available. Browser selectors are usually better than screen coordinates for a web page; accessibility elements are usually better than image matching for a native control. Vision and LLM nodes are useful fallbacks, not substitutes for a stable target.
Automation sessions
Section titled “Automation sessions”Use Start Automation Session at the beginning of a desktop automation and Stop Automation Session when it finishes. Keeping the session explicit makes resource ownership and cleanup visible in the Flow.
A typical desktop recipe is:
- Start an automation session.
- Find or focus the target window.
- Locate an accessibility element, template, or coordinate.
- Perform the interaction.
- Assert the expected result or take a checkpoint.
- Stop the session on both success and failure paths.
Browser automation
Section titled “Browser automation”The Browser catalog covers the complete page lifecycle:
| Capability | Current nodes |
|---|---|
| Lifecycle | Open Browser, Attach to Browser, New Page, Close Page, Close Browser (Start WebDriver and Stop WebDriver are kept only for existing Flows) |
| Context | List Tabs, Select Tab, Enter Frame, Leave Frame, Handle Browser Dialog |
| Navigation | Go To URL, Go Back, Go Forward, Reload |
| Interaction | Click Element, Double Click Element, Right Click Element, Drag Element, Hover Element, Scroll Into View |
| Input | Type Text, Press Key, Key Chord, Select Option |
| Waiting | Wait For Selector, Wait Delay, Wait For Network Idle |
| Extraction | Get Text, Get Attribute, Get HTML, Execute JavaScript |
| Capture | Take Screenshot, Screenshot Element |
| Files | Uploads, download directory configuration, download triggers, and download waiting |
| State | Cookie, local-storage, and session-storage operations |
| Diagnostics | Console logs, network requests, DOM snapshots, and accessibility snapshots |
Recipe: submit a web form reliably
Section titled “Recipe: submit a web form reliably”- Open Browser and create a New Page. Start the Network Observer before navigation if you plan to wait for network idle.
- Navigate with Go To URL.
- Use Wait For Selector before interacting.
- Enter values with Type Text and submit with Click Element.
- Wait for either the result selector or network idle.
- Capture the final state with Take Screenshot.
- Close the browser in the cleanup path.
Use selector-based browser nodes for browser content. They accept the typed Selector output as well as existing CSS strings. Keep the returned session handle for the intended tab and frame; switching one branch does not retarget a different branch’s handle.
Start Network Observer must run before the requests you want to observe. Wait For Network Idle uses outstanding requests from that observer. Basic authentication credentials are restricted to the configured HTTP(S) origin and are not exposed to page JavaScript.
Select Option fails
when no option has the requested value, so a changed dropdown stops the Flow
instead of leaving the old selection in place. A select step in
Execute Browser Action Plan behaves the same way.
Coordinate-based desktop input is more fragile when zoom, layout, or window position changes.
Which browser runs a Flow
Section titled “Which browser runs a Flow”Browser nodes control Chrome or Microsoft Edge directly through the browser’s DevTools protocol. You do not need to install or start a WebDriver such as chromedriver, and a run never downloads a browser.
Open Browser launches its own browser window with a fresh temporary profile, or with the folder in Profile Directory when cookies and logins should persist between runs. Browser Type decides which browser it looks for:
- Chrome uses an installed Google Chrome first (stable, then Beta, Dev and Canary), then Chromium on macOS and Linux, then Chrome for Testing if you installed it. On Linux, Chromium from Snap comes last, after Chrome for Testing.
- Edge uses an installed Microsoft Edge only.
When no matching browser is installed, the run fails with a message that lists the locations searched. Install the browser that Browser Type names, set Browser Type to the browser you have, or, for Chrome, open Settings > Automation in Flow-Like Desktop and install Chrome for Testing (about 200 MB from storage.googleapis.com; on Linux, read the AppArmor note below first). The same page lists the browsers it detected, and updates and removes Chrome for Testing. Chrome for Testing is not available for Windows on ARM; use Chrome or Edge there.
Firefox and Safari are not supported yet. A Flow whose Browser Type is Firefox or Safari fails with an error that asks for Chrome or Edge; support for them is planned through WebDriver BiDi.
On Linux, Chromium from your distribution’s package is used before Chrome for
Testing. Chromium from Snap, which is what Ubuntu runs for chromium and
chromium-browser, is used only when no other Chrome, Chromium or Chrome for
Testing is found. Snap Chromium keeps its temporary profiles in
~/snap/chromium/common and needs a Profile Directory inside your home
folder. If Flow-Like itself crashes, a Snap Chromium window can stay open;
close it yourself. Chromium from Flatpak is not used.
Ubuntu 23.10 and newer, and other distributions that restrict unprivileged
user namespaces with AppArmor, block the sandbox of Chrome for Testing.
Flow-Like checks this before launch: a run that would use Chrome for Testing
fails with a message that suggests Google Chrome, Microsoft Edge or the
sysctl command below, and the browser is never started without its sandbox.
Google Chrome, Microsoft Edge and Snap Chromium are not affected. On such a
system, do one of these:
- Install Google Chrome from Google’s package. It is used before Chrome for Testing, so it also takes over from an installed Chrome for Testing.
- Install Microsoft Edge and set Browser Type to Edge.
- Use Snap Chromium. Chrome for Testing is used before it, so do not install Chrome for Testing, or remove it in Settings > Automation.
- To use Chrome for Testing anyway, allow unprivileged user namespaces with
sudo sysctl kernel.apparmor_restrict_unprivileged_userns=0. This relaxes a security setting for the whole system and lasts until the next restart.
A Profile Directory cannot be your everyday Chrome or Edge profile, because Chrome 136 and newer block automation there. Only one browser can use a profile directory at a time, and a profile last opened by a newer browser version is refused rather than downgraded.
Attach to a running browser
Section titled “Attach to a running browser”Attach to Browser controls a Chrome or Edge that is already running. Debugger Address decides how it connects:
| Debugger Address | Connects to |
|---|---|
host:port or http(s)://host:port | A dedicated debugging browser started with --remote-debugging-port and its own --user-data-dir |
| Empty | Your everyday Chrome or Edge, after you allow remote debugging |
ws:// or wss:// on another machine | The browser-level DevTools WebSocket of a remote browser service, such as wss://browser.example.com/devtools/browser/<id> |
ws://127.0.0.1:<port>/devtools/browser/<id> or ws://localhost:… | Handled like an empty address: the everyday-browser connection, with its consent wait and download limits |
For a dedicated debugging browser on this computer, use host:port, not its
ws:// URL. With a remote browser service, uploads and downloads would use
paths on the remote machine, so the file nodes are not supported there.
Start a dedicated debugging browser with its own profile folder, then enter
127.0.0.1:9333 as the Debugger Address:
# macOS"/Applications/Google Chrome.app/Contents/MacOS/Google Chrome" --remote-debugging-port=9333 --user-data-dir="$HOME/flow-like-debug-profile"# Windows (Command Prompt)"C:\Program Files\Google\Chrome\Application\chrome.exe" --remote-debugging-port=9333 --user-data-dir="%LOCALAPPDATA%\flow-like-debug-profile"# Windows (PowerShell)& "C:\Program Files\Google\Chrome\Application\chrome.exe" --remote-debugging-port=9333 --user-data-dir="$env:LOCALAPPDATA\flow-like-debug-profile"# Linuxgoogle-chrome --remote-debugging-port=9333 --user-data-dir="$HOME/flow-like-debug-profile"A Chrome installed for your user only lives in
%LOCALAPPDATA%\Google\Chrome\Application instead. Edge takes the same two
flags.
To attach to your everyday browser instead (Chrome 144 or newer, or an Edge version that offers the same setting):
- In that browser, open
chrome://inspect/#remote-debuggingand turn on Allow remote debugging for this browser instance. - Clear Debugger Address on Attach to Browser. For Edge, also set Browser on that node to Edge.
- Run the Flow while a browser window is open. The browser asks Allow remote debugging?; click Allow within two minutes. It asks again on every run.
While the Flow is connected, the browser shows a banner saying it is controlled by automated software. The Flow can read and change everything in that profile, including cookies, saved logins and open tabs, so use this mode only for Flows you trust.
After you allow remote debugging, your everyday browser usually listens on
127.0.0.1:9222, which is also the default Debugger Address. Attach to Browser
does not take over the everyday profile through that address; it stops and asks
you to clear the address. Use another port, such as 9333, for a dedicated
debugging browser.
Closing the automation session disconnects an attached browser; it does not own the browser’s lifetime. With your everyday browser, downloads stay in its own download folder and Set Download Directory reports an error; use Trigger Download and point Wait For Download at that folder. Downloads from popup windows are not reported in this mode. With a dedicated debugging browser, Set Download Directory changes that browser’s download folder until it restarts.
Legacy WebDriver inputs
Section titled “Legacy WebDriver inputs”The WebDriver URL inputs on Open Browser and Attach to Browser remain
so existing Flows keep loading. A local address, such as the defaults
http://localhost:9515 and http://127.0.0.1:9515, is ignored and the browser
is launched or attached directly. A remote WebDriver host, or a local WebDriver server other than
ChromeDriver or msedgedriver (for example geckodriver or Selenium Grid), makes
the node fail. Start WebDriver starts nothing and outputs a local address
for compatibility. Stop WebDriver closes the session’s browser like Close
Browser. New Flows need neither node.
Computer automation
Section titled “Computer automation”Computer nodes interact with the active desktop session.
Accessibility
Section titled “Accessibility”Get Accessibility Tree inspects the accessible controls exposed by the current interface. Find Accessibility Element locates a target from that structure.
Act on Accessibility Element invokes, focuses, or sets a value on the identified native control. It checks that the target still matches before acting.
Accessibility targeting is the preferred starting point for native controls because it can remain stable across window movement and display scaling. Some custom-rendered applications expose little or no useful accessibility metadata; use Vision or a coordinate fallback for those interfaces.
Windows and displays
Section titled “Windows and displays”The current Window nodes can:
- list windows and inspect the active window;
- find a window by title;
- focus a window;
- minimize, maximize, restore, move, resize, or close a window;
- capture a window;
- launch an application.
The Display nodes list displays and identify the primary display. Resolve the intended display or window before using absolute coordinates.
Mouse, keyboard, and clipboard
Section titled “Mouse, keyboard, and clipboard”The Computer catalog includes:
- Mouse Move, Natural Mouse Move, Mouse Click, Mouse Double Click, Mouse Drag, and Scroll;
- Type Text and Key Press for keyboard input;
- text and image clipboard getters and setters;
- Wait for deliberate pauses between interactions.
Set Clipboard Text and Set Clipboard Image also work outside desktop automation. They use the device API when the Event runs locally and ask the invoking frontend to copy the result when it runs remotely. Their automation session input is optional, and existing session connections still pass through. Clipboard readers continue to require local desktop execution.
A remote write needs a live client invocation. A scheduled or API-only run has no user clipboard to address. The write follows its success output only after the client acknowledges it; otherwise it follows the error output with a structured error. Browsers may show a Copy result button when they require a fresh click. Requests expire when their client timeout elapses or the run ends and are never executed from saved run output.
The optional Keep on device and Expire after inputs use iOS clipboard protections. A host that cannot enforce these options returns an error. Text is limited to 1 MiB and images to 16 MiB of PNG data. Writing clipboard content does not send a paste keystroke to another application.
Use Natural Mouse Move when the path itself matters. Use Mouse Click or Click At Position only after resolving the correct coordinates for the current session.
Screen capture and visual targeting
Section titled “Screen capture and visual targeting”The current catalog separates general computer capture from Vision helpers:
| Task | Node |
|---|---|
| Capture the desktop | Screenshot |
| Capture a rectangular region | Screenshot Region |
| Save a capture to a file | Screenshot To File |
| Locate one template | Find Template |
| Locate every matching template | Find All Templates |
| Find and click a template | Click Template |
| Wait for appearance or disappearance | Wait For Template / Wait Template Disappear |
| Inspect the display | Get Screen Size / Get Pixel Color |
Recipe: resilient template interaction
Section titled “Recipe: resilient template interaction”- Capture a current region rather than searching an unnecessarily large display.
- Use Wait For Template with a deliberate timeout.
- Locate the template and inspect its match before clicking when the action is consequential.
- Click with Click Template or use the returned position with a mouse node.
- Assert that the expected follow-up template or color exists.
- On failure, take a snapshot and enter a recovery path.
Template and fingerprint modes require a unique current target. A missing or ambiguous match stops the action. Choose coordinate mode explicitly when a Flow should click a fixed location without validating a visual or accessible target.
Template images should be cropped around a distinctive, stable control. Recreate them when the target application’s theme, display scaling, or visual design changes.
Reliability and recovery
Section titled “Reliability and recovery”RPA helpers make failures explicit instead of hiding them inside a long chain of UI actions.
| Concern | Useful nodes |
|---|---|
| Bounded execution | With Timeout, Delay, Calculate Elapsed |
| Retry | Retry Loop, Wait For Template, Wait For Color |
| Assertions | Assert Template Exists, Assert Color At Position |
| Checkpoints | Save Checkpoint, Parse Checkpoint, Take Snapshot |
| Error paths | Try Catch (Control), Error Recovery, Diagnose Failure |
| Audit trail | Log Action |
For an important interaction:
- Bound the operation with a timeout.
- Wait for a deterministic readiness signal.
- Perform the action.
- Assert the resulting state.
- Retry only failures that are safe to repeat.
- Capture diagnostic evidence before recovery or exit.
With Timeout cancels the action branch cooperatively. An operating-system or browser request already submitted may still complete, so verify the target state before retrying an action with external effects. Retry only when the operation is idempotent or you can determine whether it already succeeded.
Selectors and fingerprints
Section titled “Selectors and fingerprints”Selectors let a Flow keep several ways to identify the same target. Build a selector, combine alternatives into a selector set, validate them, rank the candidates, and retrieve the best current match.
Fingerprints store descriptive target data that can be compared or updated later. They are useful when a target changes slightly between versions but retains enough stable characteristics to identify it.
Use these layers to make fallbacks deliberate:
- stable browser or accessibility selector;
- alternate selector or stored fingerprint;
- template match;
- coordinate fallback;
- optional LLM-assisted resolution.
Optional LLM assistance
Section titled “Optional LLM assistance”LLM automation nodes cover three groups:
- Vision: observe or classify a screen, find or describe an element, extract structured information, resolve candidates, and rank matches;
- Planning: plan actions or suggest the next step;
- Healing: diagnose a failure and propose a repaired selector or template.
Use a configured model only when deterministic methods do not provide enough signal. Treat its output as a proposal: validate the selected target and add a bounded fallback before performing consequential actions.
Plan Actions defaults to general proposals, including native desktop targets. To feed Execute Browser Action Plan, select its Browser execution target and supply Page Context from a DOM or accessibility snapshot. Browser plans must use selectors grounded in that context; the executor validates supported actions and their parameters before running them.
Recording
Section titled “Recording”The recorder creates editable nodes from your actions. Native recording waits for the input hook to start before showing a recording state. Stop it with the configured global shortcut or the tray menu, including while another application has focus. While Desktop stays open, a completed recording remains available until you insert or clear it on its original profile, app, and board. Insert recordings before quitting Desktop. Switching profiles stops active recording and clears its preview. Opening another profile or board cannot insert or discard the retained recording.
Native recording preserves mouse buttons, modifiers, scroll positions, window focus, and clipboard shortcuts. Optional target images and accessibility fingerprints use a recent hover sample from the same position and window, taken before the click changes the control. If no matching sample is available, the recording keeps the action coordinates. Inserting with template or fingerprint replay enabled requires the corresponding sample; choose coordinate replay when that evidence is unavailable.
Native recording cannot reliably identify secure fields, so typed or pasted secrets can be saved. Pause before entering secrets and configure credentials explicitly in the Flow.
For web pages, select browser recording and supply the debugger address of a
dedicated Chrome or Edge debugging browser, started with
--remote-debugging-port and its own --user-data-dir as described in
Attach to a running browser. Recording cannot
use the consent connection to your everyday browser. No WebDriver is needed:
replay launches or attaches to Chrome or Edge directly, and the recorder’s
Legacy WebDriver URL (not needed) field can keep its default. A remote host
in that field makes replay fail. Browser recording creates selector-based actions, waits for
their targets, and keeps tab and frame context. It does not require desktop Input Monitoring. The
browser must expose its debugging endpoint before recording begins. Cross-origin
frames and shadow-DOM targets cannot currently be recorded as document selectors;
the recorder reports that limitation. Add frame or custom targeting steps to the
Flow when a page requires them. Password and file-input values are excluded
from browser recordings; configure those steps explicitly in the Flow.
Permissions and operating-system behavior
Section titled “Permissions and operating-system behavior”Automation approval is separate from operating-system access. Desktop inspects the actual workflow revision, asks for its capabilities, and checks them again at native execution. Background Events require a remembered approval.
| Platform | Native integration and requirements |
|---|---|
| macOS | Accessibility supports native element lookup and actions, window control, and input. Screen Recording is checked separately for captures. Native recording checks Input Monitoring and Accessibility for window identity. Grants belong to the current executable and signing identity. |
| Windows | Native elements use UI Automation. Input and window actions run in the interactive desktop; elevated applications and the secure desktop can reject them. |
| Linux with X11 | Input and capture require an accessible display. Window control uses native X11 messages and verifies the window manager’s supported operations and resulting state. Native accessibility uses the AT-SPI session bus and the target application’s exposed controls. |
| Linux with Wayland | Input control uses a compositor RemoteDesktop session retained for the app session. Select the displays to control in its portal; absolute movement requires their logical position and size. Pointer-location queries are unavailable through this backend. Capture availability depends on the screenshot backend and may require approval for each capture. Global native input recording and generic native window management are not available through this backend; browser recording and browser automation remain available. |
| iOS and Android | The desktop automation catalog is unavailable. Device clipboard operations use the separate device integration. |
The permission dialog identifies denied, unavailable, and unsupported capabilities. Recheck after granting access. If macOS still reports denial, quit and reopen the app and verify that System Settings lists the executable you are running.
Test capture, input, and target lookup on the machine that will run the Flow. Repeat that check after operating-system, application, theme, or display changes.
When upgrading an existing Flow, review collection connections on Upload Multiple Files, Observe Screen, Plan Actions, Rank Candidates, and Resolve Element. These nodes now declare their array item types. Before catalog synchronization, migration checks the changed pins against their new contracts and preserves compatible saved array literals and connections. Repair values that fail the new item schema, and connections into typed inputs from incompatible producers or generic producers whose item type cannot be determined. Validate the Flow before running it. Existing CSS selector pins and their connections are preserved alongside the added typed locator inputs.
Saved mouse nodes retain an explicitly enabled fingerprint option. Supply a valid fingerprint or turn that option off for coordinate replay; missing target evidence now stops the action.
Design checklist
Section titled “Design checklist”- Start with a stable target, not a fixed delay.
- Resolve the intended window, page, and display before interacting.
- Prefer selectors or accessibility metadata over coordinates.
- Keep retries bounded and safe to repeat.
- Assert the post-condition after important actions.
- Capture diagnostics without exposing secrets.
- Provide cleanup paths that close pages, browsers, and automation sessions.
- Test at the same display scaling and permissions used in production.
Next steps
Section titled “Next steps”- Browse the complete Automation node catalog.
- Use Document Processing for extracted documents and images.
- Use API Integrations when the target system exposes a reliable API.
- Use Building Internal Tools to create a control surface for an automation.